はじめに
近年、製造現場では、生産性向上やメンテナンスコスト削減を目的としたソリューションとして、機械学習やAIを活用する取り組みが増加しています。これにより、より効率的で持続可能な製造プロセスが求められるようになりました。
こちらの記事シリーズでは、機械学習の一手法である「画像分類」に焦点を当て、モデルの作成からLinux搭載のPLCnext Control上での動作検証までのプロセスを2回に分けてご紹介します。
検証の概要イメージ
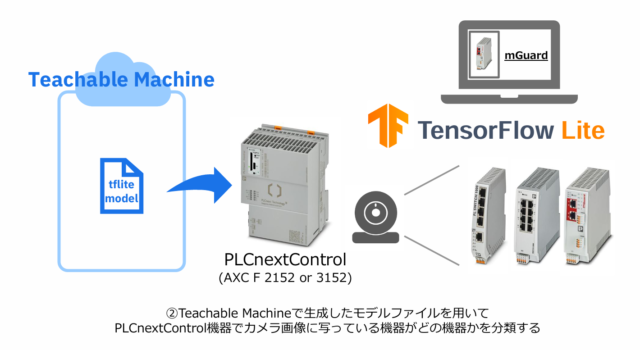
検証の全体構成イメージは以下となります。
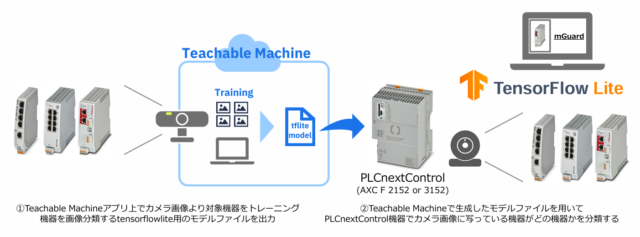
本検証では、Googleが提供するウェブアプリ「Teachable Machine」を使用します。 まず、パソコンに接続したカメラで画像分類対象となる画像を取得し、モデルのトレーニングを実施。 トレーニングによって生成されたモデルをTensorFlow Lite形式のファイルとして出力します。
次に、このトレーニングモデルをLinux機器を搭載したPLCnext Control(AXC F 2152 または AXC F 3152) に移行し、TensorFlow Liteを用いてPLCnext Controlに接続されたカメラからリアルタイムで画像を取得し、 対象の画像分類を行います。
本記事の内容
本記事ではTeachableMachineで出力したTensorFlowLite形式のモデルファイルを用いて、PLCnext Controlにて画像分類を行います。
PLCnext Control機器による画像分類 動作イメージ
手順
スクリプトファイル
本動作検証ではTensorFlowLiteDemoアプリで使用されるMyScript.pyのファイルを一部書き換えたものを用いて画像分類を行います。手順に則り対象スクリプトファイルの中身を以下に書き換えて使用してください。
本当投稿内で紹介するものはサンプルコードのため一切の動作を保証するものではありません。これらデモコードに関して発生するいかなる問題も、使用者の責任および費用負担で解決されるものとします。
MyScript.py
# Teachable_Machineモデル用プログラム

#####################################################################
# ライブラリの読み込み
#####################################################################

import os
import cv2
import numpy as np
import tflite_runtime.interpreter as tflite
import time
import requests
import json
import urllib3
from datetime import datetime
import traceback


#####################################################################
# 設定値一覧(こちらに任意の値を記載してください)
#####################################################################

def load_manual_config_params():

    # 各種データのパス設定
    model_path = "/src/tflmodels/teachable_machine/model.tflite" # モデルのパス
    label_path = "/src/tflmodels/teachable_machine/labels.txt" # ラベルのパス
    camera_url = "" # カメラURL
    output_filename= '/src/imgs/camera_snapshot.jpg'# スナップショット画像のパス・ファイル名

    return model_path, label_path, camera_url, output_filename

#####################################################################
# 関数一覧
#####################################################################

# Teachable_Machineモデルの情報確認
def load_teachable_machine_model(model_path):

    try:
        # モデルの読み込みと初期化
        interpreter = tflite.Interpreter(model_path=model_path)
        interpreter.allocate_tensors() #メモリの割り当て

        # 入力・出力テンソルの情報を取得
        input_details = interpreter.get_input_details()
        output_details = interpreter.get_output_details()

        # 量子化情報を生成(非量子化モデルの場合はNone)
        if input_details[0]['quantization'][0] == 0.0:  # 非量子化モデルの場合
            quantization_params = None

        else:
            quantization_params = {
                'scale': input_details[0]['quantization'][0],
                'zero_point': input_details[0]['quantization'][1]
            }

        return interpreter, input_details, output_details, quantization_params

    # 例外エラー
    except Exception as e:
        raise RuntimeError(f"モデルの初期化に失敗しました: {str(e)}")


# chable_Machineモデルのラベル読み込み
def load_labels(label_path):

    try:
        with open(label_path, 'r') as file:
            labels = [line.strip() for line in file.readlines()]
        return labels
    except Exception as e:
        raise RuntimeError(f"ラベルファイルの読み込みに失敗しました: {str(e)}")


# IPカメラよりスナップショットの取得
def capture_snapshot(camera_url, output_filename):

    try:

        # カメラに接続され、capというオブジェクトよりカメラを読み取れるようになる
        cap=cv2.VideoCapture(camera_url)

        # カメラとの接続確認
        if not cap.isOpened():
            # カメラと接続できなかった場合の処理
            debug_message = "指定したURLのIPカメラと接続できませんでした"
            return debug_message

        # こちらでカメラから1枚のフレーム(画像)を読み取る
        # retがtureなら読み取り成功、frameにカメラの画像データが格納される
        ret, frame =cap.read()

        # カメラのフレーム読み取り確認
        if not ret:
            # カメラのフレーム読み取り失敗した場合の処理
            debug_message = "カメラのフレーム読み取りに失敗しました"
            return debug_message

        # こちらで画像データを画像ファイルとして保存
        cv2.imwrite(output_filename, frame)

        # カメラのデバイスのリリース(リリースしないと他プログラムがカメラアクセスできない)
        cap.release()
        debug_message = "カメラのスナップショット処理に成功しました"

        return debug_message

    # 例外エラー
    except Exception as e:
        raise RuntimeError(f"IPカメラとの接続に失敗しました: {str(e)}")


# 画像ファイルのリサイズ及びモデル読み込みように処理を行う
def preprocess_image(output_filename, input_shape, quantization_params=None):

    # 画像の読み込みを行う
    image = cv2.imread(output_filename)

    # 対象の画像の存在確認
    if image is None:
        raise ValueError(f"画像ファイル {output_filename} が見つかりませんでした。")

    # OpenCVの画像フォーマットをTensorFlowに合わせて変換 (BGR -> RGB)
    image = cv2.cvtColor(image, cv2.COLOR_BGR2RGB)

    # 正規化(0~1にスケール)
    image = image.astype(np.float32) / 255.0

    # OpenCVでバイリニア補間リサイズ
    # input_shapeは [1, height, width, channels] 形式を想定
    image = cv2.resize(image, (input_shape[2], input_shape[1]), interpolation=cv2.INTER_LINEAR)

    # 量子化(量子化モデルの場合のみ)
    if quantization_params is not None:
        scale = quantization_params['scale']
        zero_point = quantization_params['zero_point']
        image = (image / scale + zero_point).astype(np.uint8)  # 量子化形式に変換

    # 次元追加([height, width, channels] → [1, height, width, channels])
    image = np.expand_dims(image, axis=0)

    return image


#####################################################################
# メイン処理
#####################################################################

def main():

    # ループ用のフラグ
    loop_flag = 0

    # loop処理カウンタ
    loop_counta = 0

    # 基本設定
    model_path, label_path, camera_url, output_filename = load_manual_config_params()

    # Teachable_Machineモデルの情報確認
    interpreter, input_details, output_details, quantization_params = load_teachable_machine_model(model_path)

    # Teachable_Machineモデルのラベル読み込み
    labels = load_labels(label_path)

    # 以下ループ処理
    while loop_flag == 0:

        # ループ処理回数をインクリメントして表示
        loop_counta += 1
        print(f"------- {loop_counta}回目 -------")

        # IPカメラよりスナップショットの取得
        debug_message = capture_snapshot(camera_url, output_filename)
        print(debug_message)

        # 画像ファイルのリサイズ及びモデル読み込みように処理を行う
        input_image = preprocess_image(output_filename, input_shape=input_details[0]['shape'], quantization_params = quantization_params)

        # 推論処理の実行
        interpreter.set_tensor(input_details[0]['index'], input_image)
        interpreter.invoke()

        # 結果を取得
        output_details = interpreter.get_output_details()
        output_data = interpreter.get_tensor(output_details[0]['index'])[0]


        # 推論結果を解釈して表示
        print("推論結果(ラベルとスコア):")
        for i, score in enumerate(output_data):
            print(f"{labels[i]}: {score}")

        # 最大値のクラスを取得
        predicted_index = np.argmax(output_data)
        predicted_label = labels[predicted_index]
        predicted_score = output_data[predicted_index]

        print(f"予測されたクラス: {predicted_label} (確率: {predicted_score})")

        # 処理のインターバル
        time.sleep(3)

if __name__== "__main__":
    main()

